 |
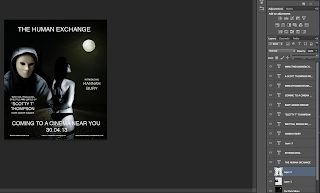
| Opacity set at 100%. The image of the woman is strong in the image. |
 |
| Opacity set at 50%. The image of the woman has become transparent. |
 |
| Opacity set at 25%. The image of the woman is barely visable. |
 |
| Opacity set at 0%. The image of the woman has disappeared. |
By clicking on the icon of the eye I am able to turn on or off any layer that I wish. Turning off a layer helps to concentrate on a particular layer that I am working on, to which I can then turn back on when to view the effect of any layers that I have chosen to be visible. Here I have selected a particular layer, in this instance of a Masked Man. By turning the layer off the masked man is removed.
 |
| The visibility of the selected layer is still ON, meaning we can still see it. |
 |
| Now the selected layer has had its visibility turned OFF. This has resulted in the masked man not being seen. |
To create a new layer there are two different ways this can be achieved. One option is by pressing the new page icon at the bottom of the layers window.
 |
| By clicking on the icon second from the right that denotes a page turn creates a new layer. This is the quickest and most effective way of creating a new layer. |
Another method is to go to the menu bar and select Layer > New > Layer
 |
| Here I have selected a new Layer using the Menu. |
To duplicate a layer you can go to the menu bar and select Layer > Duplicate Layer
 |
| How I would duplicate a layer from the menu |
An alternative option is to selecting the layer I wish to duplicate and right-clicking on the mouse and in the mini-menu select Duplicate Layer
To delete a layer there are a couple of ways that this can be achieved. The first option is select the layer to be deleted and go to the menu and select Layer > Delete > Layer.
Another option is simply selecting the layer and then dragging it to the Bin
icon at the bottom of the layers window.
 |
| By dragging the layer onto the bin icon, on the right, deletes the layer. |
By re-arranging the
order of the layers I can effectively change what layer is more prominent. I
can take a layer that maybe, say fifth in the order, and place it at the top of
the list. By doing this it will change the look of the image as shown in the screenshots.
 |
| How my image looks before moving Layers |
 |
| In this example, the Layers are how I created the image. |
 |
| I have moved Layer 2 underneath the Car Park Moon layer |
 |
| By doing this it means that Layer 2, the image of the woman, has disappeared. |
For me personally, I
think by using the icons at the bottom of the layers window are a more time
effective method when creating posters or other print media texts. This will
enable me to focus more on the creation of the product and by having the use of
the icons at the bottom of the window gives easier accessibility to these
options.
The main and most significant differences between the .psd
file and the .jpg file is you are able to edit specific parts of the image with
one of them. Firstly, and most importantly a .psd file will only open if the
user has the Photoshop software installed on their computer system. Assuming
the user has, they can open the .psd file, which will automatically open the
Photoshop editing programme, and from within this programme they can select
different parts of the image by editing different layers using many tools that
I have identified in my How-to-Guide, or of course, if the user has an
expansive knowledge around the programme. Because of the amount of information
used by the programme a .psd file is large and therefore it isn’t recommended
to be used to send via email etc, providing the recipient has the programme to
open the files.
 With a .jpg file it is possible for anyone who has the file
can do some limited editing. By this I mean when the file is edited the whole
image will be affected. For example, if I wanted to change the colour levels
the whole image will be affected. The limitations of editing a .jpg file are
extremely restrictive. The .jpg file is excellent for sending via email and for
using for print uses and websites as the file size is much smaller and cross compatible so that as many people as possible can have
access to the image for what purpose it is needed for.
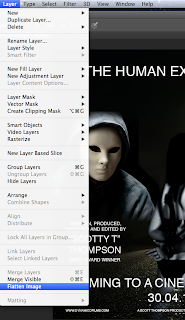
To flatten the image from a .psd file to a .jpg file I need to merge the layers. To do this I select Layer > Flatten Image from the menu bar.


No comments:
Post a Comment