In the creation of a poster there are
numerous tools that can be used to create a professional looking image that may
be used for numerous print media texts. In this instance I have identified
numerous tools to help me in the creation of my Movie Teaser Poster. These tools can be found on the left-hand side of the screen when you open the Photoshop programme such as the example shown on the left. The five tools I have selected include:
 |
| The Tool Bar in Photoshop. |
 |
| The Lasso Tool being used to prior to cutting out the moon. |
Tool 3 – Crop Tool; with this tool I am able to select parts of my image and either CUT or TRIM my images to a required size. In essence, the crop tool acts a guillotine to cut an image or a selected part of an image, to size. In the exapmle shown to the left, if I were to cut this as the areas inside the white grid would be the new image, removing the excess outside of the grid.
 |
| The crop grid is evident in this image as an example. |
Tool 3 – Crop Tool; with this tool I am able to select parts of my image and either CUT or TRIM my images to a required size. In essence, the crop tool acts a guillotine to cut an image or a selected part of an image, to size. In the exapmle shown to the left, if I were to cut this as the areas inside the white grid would be the new image, removing the excess outside of the grid.
 |
| I used the Brush Tool to cover the moon in red "paint". A look that I would not use for this poster. |
 |
| The Eraser Tool has removed the dark "paint" and the layer to reveal more of the moonshine. |
Each of these tools has numerous hidden
tools. By selecting one of these I am then able to customize the tool in the
options bar. By customising the options I can fine tune any element of an image I wish to alter. Below I have listed three tools with a hidden tool.
The tools with hidden options I have selected are; the Brush Tool [below, on the left are the hidden tools within the Brush Tool section; on the right the options that the Brush Tool has].
the Crop tool [below, on the left are the hidden tools within the Crop Tool section; on the right the options that the Crop Tool has].
and the Eraser tool [below, on the left are the hidden tools within the Eraser Tool section; on the right the options that the Eraser Tool has].

 The colour swatch enables me to change
colours within my poster. Also with this tool I can customize my own colour and
add it to the colour swatch so that I can easily access it when I need to do
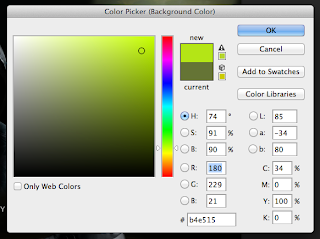
so. To enable me to do this I first click on the two coloured squares on the Tool Bar [as indicated on the left] which brings up the Colour Picker [on the right].
The colour swatch enables me to change
colours within my poster. Also with this tool I can customize my own colour and
add it to the colour swatch so that I can easily access it when I need to do
so. To enable me to do this I first click on the two coloured squares on the Tool Bar [as indicated on the left] which brings up the Colour Picker [on the right].I can then position the small circle in the square to get white, black or any shade of green in between. By adjusting the sliders either up or down the coloured bar will enable me to change to a wider selection of colours. Each colour has a different value of Red, Green and Black. I could also change colour by changing the different these three different values. However, I would need either an expansive memory bank or lots of luck on guessing the right values to get the colour I want or need! Once I have selected a colour it will have its own value. In the colour I have chosen the value is #b4e515 and this is shown in the box at the bottom on the screenshot. Knowing these values is great should I ever need to replicate this colour for any other project. By typing this value in other design software the same colour would appear. But, for simple access within Photoshop, should I need this colour again I simply click on 'Add to Swatches'.
A box will appear where I can name the colour that has been created. The Green I have created I have named 'Photoshop How-to Green'.
When I click OK the colour I have created appears in the Colour Swatch as you can see on the bottom row of colours.


1.1 Identify tool functions
ReplyDeleteIdentify and evaluate tool functions
G3, G7
1.2 Use a range of the available selection tools Use a range of the available selection tools and evaluate
G3, G7
1.3 Customize options for tools
Customize options for tools and apply appropriately to work
G3, G7
1.4 Select ‘hidden’ tools
Select ‘hidden’ tools and apply appropriately to work
G3, G7
1.5 Customize colour swatch tool
Customize colour swatch tool and apply appropriately to work
G3, G7