Step 1
Like all
projects I initially started by creating new project. To do this I opened the
Photoshop editing programme by selecting File
> New.
Step 2
I selected
my paper settings of International Paper,
A4, and made sure that the resolution was 300pixels/inch.Step 3
I then wanted to import an image of a Mask on a black background. I achieved this by going to File > Open and by selecting the folder I wished to look in from the Look in dialogue box. I selected the file I wanted then clicked on Open. This makes this image the background layer.
Step 4
To ensure any changes I made didn’t affect the original
background layer I duplicated this image. I achieved this by right clicking on
the mouse and by selecting Duplicate
Layer.
Step 5
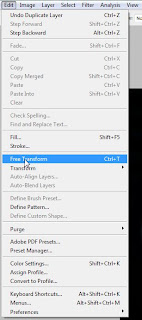
I then wanted to make the image of the Mask smaller so that
I could fit other images and text onto the page. To do this I ensured the layer
I wanted to edit was selected, as shown in the screenshot above, and then
selected Edit > Free Transform.
After
resizing the image to the size I wanted I had to apply the transformation
before any effect took place.
As can be
seen here, the image is now smaller giving me ample space to fit any other
images or text.
Step 6
I then wanted to import another image and edit it to the
size I wanted. I found a quick way to do this was to go to File > Place.
I selected the folder from the Look in dialogue box. I selected the file I wanted then clicked on Place.
The image then appears on top of the current image but as a
new layer to enable the editing of the image.
Step 7
I then resized the image by clicking and dragging the top
right corner to the size I wanted. I positioned the image to the bottom left of
the page.
Step 8
The image had harsh square edges and I wanted to blend them
in a little by softening the edges. To do this I first used to Zoom Tool in the Tool Bar on the left
hand side of the editing programme.
Then, at
the top in the tool options I selected the Increase Zoom option.
By hovering over the section of the image I wish to zoom in,
therefore making that part of the image bigger, I am able to edit the image
more effectively as shown in the screenshot below.
Step 9
To smooth
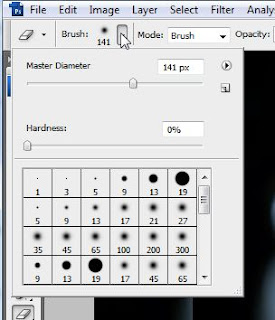
out the edges I used the Eraser Tool
in the Tool Bar.
By holding
down the left button on the mouse I am able to access the hidden tools. From
the three options available to me, I decided to stay with the pre-selected
Eraser Tool.
From the tool options I selected a Master Diameter of 141px
and a hardness of 0% to not make the edges appear as harsh as they were
previous.
Here is a
screenshot of the Eraser Tool being used.
Step 10
I wanted to
add another image and to do the same thing to it. I achieved this by following
steps 6-9. The screenshots below demonstrate this procedure.
This is the
image of my third poster before I added any text.
Step 11
To add text
I selected the Text Tool in the Tool
Bar.
By clicking
and holding on the left button of the mouse I am able to choose from four
options. I was happy for my text to go traditionally across the page, therefore
I selected the Horizontal Type Tool.
I am to choose the font, font size and font colour among the
options. I decided to use the Castellar font at size 12 and in the colour
white.
By choosing
the Text Tool and the options this automatically creates a new layer as seen in
the following screenshot.
I then
inserted text and positioned them where I wanted on the poster. Here are
numerous screenshots showing my progress as I placed numerous written texts.
I wanted
the title of the film to be in a different font, size and colour. To do this I
went to the tool options and from the drop down box I change Castellar to
Colton Grundy, changed the font size to 48, and changed the colour to red. To
change the colour of the font I click in the white box towards the right of the
tool options.
By dragging
the small circle around the box I could change colour of the text. I then
clicked OK to confirm the change.
As I did with the previous text I typed and then positioned
where I wanted the written text to go.
Step 12
The final
step was to save my image as a JPEG file so that I can use or distribute my
product. I could, although I personally don’t as it’s an unnecessary procedure,
go to Layer > Flatten. This
condenses down all the layers into one image prior to converting to a JPEG
file. Here is a screen shot of this option.
I prefer to
go File > Save As
To which I come to this window. [N.B: Whatever options you
choose you come to the same window in the same amount of steps]. In this window
I can choose the folder on my computer where I wish to store my image, give the
file a recognisable name and select the format, in this instance a JPEG, before
clicking on Save.
Once I have clicked on save a final window appears in where
I click OK.


You have hit the following criteria for Introduction to Photoshop:
ReplyDelete1.1, 1.3, 1.4, 4.1, 3.3